Hippy Mermaid look
Glitter? Check. Shimmer? Check. Lashes? Check. Today's look has it all! We are showing you how to easily transform yourself into this mystical hippy mermaid - and the best part is that it can be customised to include any colour you wish!

Lets start by creating a clean, smooth base. After applying a small amount of Clarins' Flash Balm all over the face with our hands, we are picking up our Bella&Bear Lynx Kabuki brush and some of Revlons PhotoReady Foundation and gently buffing it all over the skin.
To even out any blemishes or dark areas we are going to blend some Essence Stay All Day Concealer into our foundation with our Bella&Bear Ocelot large concealer brush - we love this brush as it makes blending your concealer a breeze and the large, flat surface area of the brushes makes quick work of things!
We have decided not to apply any powder to this look as we wanted a dewy finish but if you have oily skin or prefer a matte look then you can go ahead and apply some. (Pssst, Urban Decays De-Slick and our Bella&Bear Tiger Powder Brush are a perfect combo.)

If you just want a colourful contour then you needn't worry about this step here, but if you want full-on mermaid goodness, then you will need to pull a hair net half way over your face (use your nose to keep it there!), making sure all your hair is pushed back and out of your face. A good thing to keep in mind is that the darker the powders you apply over the net, the more apparent your 'scales' will be - so if you're going for a more subtle finish then use lighter shades!
We are starting our colour contour with a matte lilac eyeshadow (we're using the Makeup Revolution Mermaids Forever palette for this) and our Bella&Bear Leopard Powder Brush. When you apply the powder make sure to dab or press it on rather than sweeping or it will all blend in and you'll lose the scale effect. We've applied this all along our lower cheekbones, the temples and around the hairline.

To give extra depth to our colour contour we have picked up a darker matte purple shadow (from the same palette) and our Bella&Bear Margay Cat brush and we are gently 'dabbing' it into the hollows of the cheeks and around the very edges of the temples and hairline.
To follow this we have picked up our Bella&Bear Leopard Powder brush again but this time we are filling it with a pearl or opalescent shadow (we've used 'Cosmic' from the BH Cosmetics Galaxy Chic palette) and we are placing it all over the work we have just done to give it a mythical shimmer!

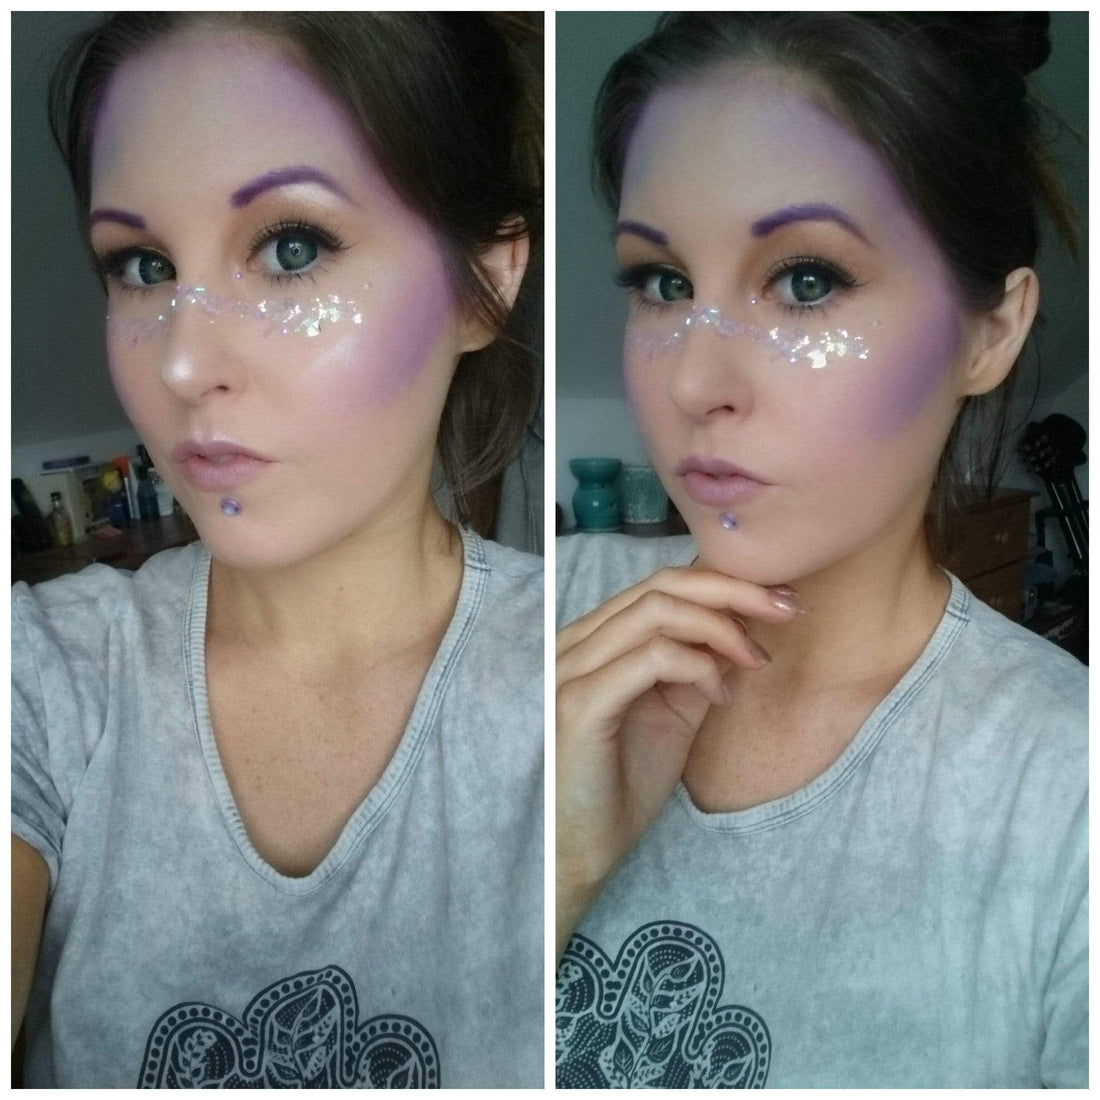
You can then remove the net and reveal your work - as you can see we have minimal scale effect as we have used lighter shades, but the colour contour is still stunning! We have also chosen to add some 'large eye' lenses by Pinky Paradise to the look to make it more magical but this step is optional as lenses are not suitable for everyone - you'll still look amazing without them!

To give the eyes a little sparkle, we are picking up our Bella&Bear Pampas Cat Fluffy brush and liberally sweeping the lid with a golden shadow - we've used 'Saturn' from the BHCosmetics Galaxy Chic palette.
We then used the same matte purple shadow from before and applied it through our eyebrows with our Bella&Bear Iberian Lynx Duo Brow brush in short strokes. We started by brushing though the brows and shaping them with the spoolie end and then applied the product through them with the angled brush end. This brush is one of our faves as it has everything you need for perfect brows; the angled brush end gives great control and a natural finish - and its great for taking on your travels!

Lets add some glam to this look!
We have picked up our Bella&Bear Caracal Eyeliner brush and some Maybelline 24hr Color Tattoo in 'Timeless Black' and created an extended wing along the upper lashline.
After allowing this to dry we curled our lashes for some lift with our Bella&Bear 'Eye&Mighty' lash curlers and applied a light coat of Urban Decays Perversion mascara to the top lashes only.
If you want to inject some extra definition to the eyes then you could add some lashes like us! We've used our Bella&Bear angled tweezers to help give us control when applying our lashes and get them as close to the lashline as possible. These lashes are Eylure Exaggerate 141.

For that mystical mermaid sparkle, lets add some glitter! We've chosen iridescent purple glitter flakes but you can chose any colour to match your theme. We applied some lash glue along the top of the cheeks and pressed on the flakes with our finger. You can apply the glitter wherever you prefer - get creative!
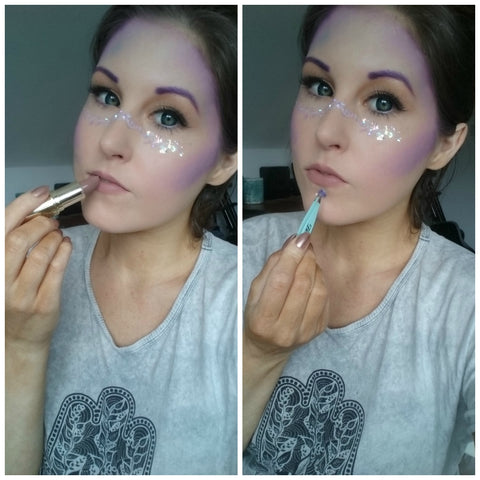
To bring the look to the lips we've applied some Gerard Cosmetics Lipstick in 'Underground' - applying it in a rounded shape on the lips for a bigger pout - we will be enhancing this in the next step, just give it a few seconds to dry.
We also decided to apply a large iridescent gem to the area just below the lips for an edgy touch - but you could add whatever you like! We applied it by gripping it in our Bella&Bear pointed tweezers and gently pressing it onto the skin, holding in place for a few seconds. We also applied some mini gems to the inner corners of the eyes!
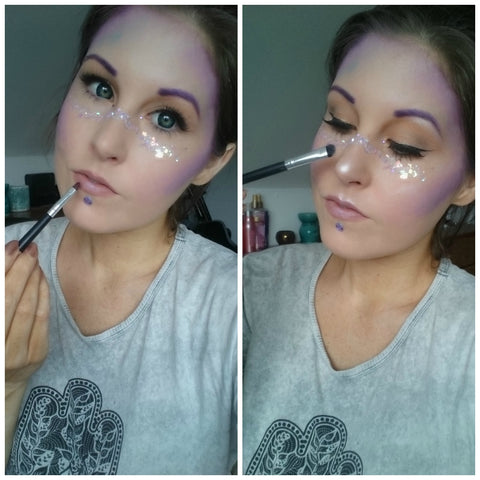
Back to the lips - we've taken the same pearl shadow that we used on our contour and also our Bella&Bear Rusty Spotted Cat Lip Brush and we've applied it across the lips for a subtle glimmer.
For that mythical mermaid glow, lets add some highlighter. We're using the Makeup Revolution Blushing Heart in 'Iced Hearts' and our Bella&Bear Marbled Cat brush and were applying the lightest shade along the high points of the cheekbones, on the tip of the nose, the brow bones and on the cupids bow of the lips - isn't that pretty?!
To keep everything in place for as long as possible, spritz your face with Urban Decays 'All Nighter' setting spray - it gives your make up such a dreamy finish.

This look is so verastile that we think you could sling on a vibe tee and rock it at a festival this summer, or add in a coloured wig for full-on fancy dress! However you decide to wear this look - enjoy it! We'd love to see your recreations so make sure to tag us on Insta (@Bella_andbear) and dont forget you can find all of the Bella&Bear tools used in this tutorial in our online store!