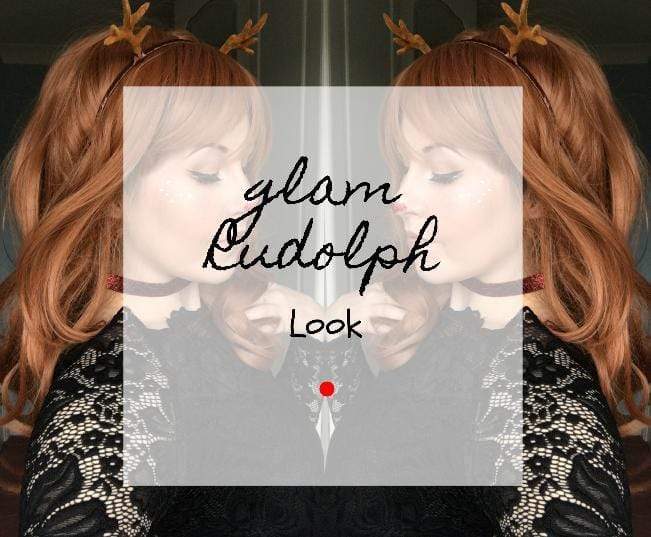
Glam Rudolph makeup
Christmas isn't always about the glam parties .. sometimes you just have to do a little dress up! Today's post is a fun Rudolph the red nosed Reindeer inspired look which is simple to create and as well as super cute! Its got a hint of sparkle, wide eyes, and cute freckles.

We're going to start with the skin so, after priming with some Gerarad Cosmetics BB+ Illumnation creme, we are going to apply our full coverage foundation to the face with our Bella&Bear Jaguar angled kabuki, being sure to blend around the jaw and neck to avoid tide lines. We used the TooFaced Born this Way foundation.
To create a smooth and even skin we are next going in with our concealer to hide and disguise any problem areas such as dark circles or blemishes. We used the Essence Camouflage concealer here and blended it in to our base with our Bella&Bear Golden cat small concealer brush.
Now, we're going to set that concealer in place. To keep our skin glowing and dewy we are making sure to only set the areas to which we applied concealer. We used our Bella&Bear Margay Cat brush to press some ELF Studio HD powder on. If you have particularly oily skin or prefer a matte look then you can dust the whole face with powder here.

Lets go ahead and contour the face now. We're using a matte bronzer here; Hoola by Benefit is one of our faves or if you're on a budget the Elf Bronze quad is beautiful too. We used our new Bella&Bear Bobcat brush to generously dust the hollows of the cheeks and the temples with the bronzer, keeping it darker at the hairline for a more natural look. We also dusted the jawline and then we used our Bella&Bear Margay Cat brush to contour the sides of the nose for a delicate, feminine look.
For a cute rosy glow we are taking our Bella&Bear Cheetah Duo Fiber Powder brush and a matte dusty pink blush (we used the Essence Matte touch blush in 10) and we are working it directly onto the apples of the cheeks.
To lock that all in place we are spritzing the face with a setting spray. We love the Makeup Revolution Oil Control fixing spray - it smells great and leaves the skin glowing!
Now lets start working on the eyes! Taking a primer - such as the TooFaced Shadow insurance primer - we are applying it right over the lid and up to the brow bone, working it in with our ring finger.
Once you've primed its time to apply that base shadow. We're using a matte ivory shadow and again we're working it over the lid and up to the brow bone with our Bella&Bear Sand Cat brush. We used the Lick and Lash Beauty 35 colour warm palette for this look.
We're working on making the eyes look wide and glistening for this look so the next thing to do is to take our Bella&Bear Bornean Bay brush and a matte taupe shadow and we are going to work that into the crease of the eye with a windscreen wiper motion for an even application.
Now, we want to darken the outer corner of the eye to define the shape. Using our Bella&Bear leopard car bush and a dark brown shadow we are going to apply it to the outer V of the eye, blending it inwards.

For a hint of glow, we're using a champagne shimmer shadow and we are applying it directly to the centre of the lid using our Bella&Bear iromote brush, this brush is great as it has a wide surface but you could also use your Bella&Bear Golden Cat brush for the same effect.
We're now going to define the eyes with our liner! We're using a black liner and our Bella&Bear Serval angled liner brush and we are going to carefully create a long thin wing along the upper lash line. You can take your time with this, adding length a little at a time for a clean finish.
Once that has set, lets curl those lashes for some lift. We use our awesome Bella&Bear Eye&Mighty lash curlers for this, curling for 20 seconds on each eye.

Let's lock that curl in with a coat of mascara. We applied some Benefit Theyr'e Real mascara to the top lashes and then used our Bella&Bear angled tweezers to place a set of falsies as close to the lashline as possible. We used the Eylure exaggerate #141 lashes here.
Its time to work on the bottom half of our eyes now. Rudolph has those beautiful wide set eyes so we are going to replicate that with some white face paint. Using our Bella&Bear Caracal liner brush we are going to carefully create a wider waterline along the bottom of the eye.
To define this from our base makeup we are going to outline it with that same dark brown shadow we used on the outer corner of our eye. We used our Bella&Bear Fishing Cat brush for this.
To finish off the eyes lets frame them by filling in the brows. Using the spoolie end of our Bella&Bear Iberian lynx brow brush we are first going to brush the brow hairs into place. Then, using the brush end, we are going to fill them in with some ABH Dipbrow pomade.

Let's make that skin super radiant with a little highlight. Taking some Makeup revolution Sugar and Spice highlight and our Bella&Bear Margay Cat brush we are going to generously dust the cheekbones and temples, the centre of the nose, the cupids bow and the browbones.
As for Rudolph's signature red nose - we are going make it sparkle! We started by applying some glitter fix (or lashglue) to the tip of nose and we then pressed on some red glitter using our Bella&Bear Ocelot concealer brush.
To add to the reindeer look we are also going to add some marking to the cheeks and temples. Once again using our Bella&Bear Caracal brush and some white face makeup we are going to create freckle like markings on the skin; these can be in all different sizes and randomly placed!

Finally, lets fill in the lips for a perfect pout. Using our Bella&Bear Rusty Spotted Cat Lip Brush we are going to fill in the lips with some MAC Velvet Teddy. This brush allows for precision application and an even finish!
You can then once again go in with some setting spray to lock everything in place!
Perfect - you now look just that part for any festivities! But, if like us you want to add some extras then how about a sparkly choker necklace and a sweet antler headband?
We also decided to add a red wig to really compliment the nose. We find the easiest way to do this is to brush through the hair with our Bella&Bear the Bear paddle brush to remove any knots and tangles and create a centre part. Then, we made a tight braid on each side of the head. To follow this we pinned each braid securely to the back of the head keeping everything ads flat as possible. We then popped on our wig cap and finally, our wig!

Share your festive selfies with us on insta and dont forget you can stock up on those Bella&Bear pressies in our online store right now!